
#### This is a recovered page ####
'LOGVIEW FOR WSJT-X' SOFTWARE
Requires WSJT-X 1.9.x or later
15 June 2018
Replaces ‘WSJT-X Log File Viewer’ started 27th March 2018
Please ensure that you read all of the descriptive texts on this page.
BEWARE of warning errors on 60 metres : fix is here !
The original Log File Viewer software tuned out ok but it did have some issues related mainly to the fact that it required multiple timers to set up the background processes: copying changed files from the source WSJT-X folder, processing them. It actually got messy and occasional errors appeared.
This ‘new’ LogView for WSJT-X was effectively re-started as a new project based on different file techniques, using different update techniques and a single timer to check and process WSJT-X files only at non-critical times. It does some updates as it starts up, not every time though, and that becomes obvious as you see a progress bar appear, increment towards 100% and then disappear. There are 3 different updates done this way as it ‘thinks’ they are needed.
One thing that users of both packages will notice is that QSO details appear immediately in this new package where it might have taken a few seconds to change in the original. The use of WSJT-X version 1.9.x (or later) is mandatory as V1.8.x does not have the required support inbuilt so a computer using 1.8 will provide a warning message and then halt the software.
Be warned that you are likely to have a Windows Firewall (or other firewall software if installed) warning the first time the LogView software is executed. Ensure that you allow it to access at least the local/private network. This software does NOT access any internet-based sources directly although some hyperlinks may be implemented in later releases but the normal ‘default’ browser does the actual work.
Some of the functionality was extracted directly from the older software and updated to use the newer file handling techniques and then presented to the user, sometimes slightly differently than in the original, but definitely quicker. Unchanged functions include the callsign to country lookup, log file format (still in a CSV compatible format), ADIF export format.
Some of the functions in WSJTXViewer have not been - and will not be - implemented in this package. The font size has been preset to 11 point and font is Times New Roman in all results boxes. The operating mode selection (eg FT8, JT4…) has not been implemented – all log entries contained in the WSJT-X log are always displayed.
This software does have another side benefit: it can plot either the callsign or the grid square (user selected) on a world map image - but only if the Map box is ticked. Whether you utilise the Map feature is going to be determined by how much screen real estate is available after the Viewer plus WSJT-X and the waterfall displays are all showing. A dual monitor arrangement works well as the map image can be moved across to the second monitor.
A warning: if you move the mapping window, it WILL erase any callsigns or grid details shown beforehand.
The map function also allows you to 'explore' the globe and displays grid squares, latitude and longitude while you move the mouse over the image. Note that the title is "approximate position" because the quality of the map image(s) is not overly high so the ability to closely find an exact point is impossible.
I must point out that the legibility of the text overlay, callsign or grid square, is determined by the amount of scaling available on your individual computer screen. A bigger map image provides better labelling. The fallback is to use a lower resolution image from the three available in the download ZIP file, where the latter names indicate the overall image size. The smallest at 600x300 pixels is the best where only small screen real estate is available and the softwareis set up to look for the highest resolution image first, medium then low. The easiest way to set up the map display is to rename the relevant image files before you execute the LogView software - don't delete the images, simply rename them.. For example, renaming mapx.png (at 1883x1308 pixels) to mapx.pngxxx is the best way to make the mapping run in medium resolution mode. Ditto, then renaming world964x464.png to world964x464.pngxxx is the best way to make the mapping run in low resolution mode. If no suitable map image names are available, mapping is not enabled.
The top left hand corner of the label on the map is the actual place marker as calculated from the grid square.
Another function that had been incorporated, PSKReporter data retrieval and processing, has been forked to a separate project named PSKRepView with detail available from a separate page on this web site.
One benefit of similtaneously using both applications is that PSKRepView creates a file (PSKgrids.txt) containing the same type of detail as is contained in grids.txt. That file is searched for by LogView and the callsign and grid square details are incorporated into LogView's grid.txt file at startup.
======================================================================
How I use it in practice.... I can see who I have worked fairly quickly by scrolling up or down the callsign list box - or - do a full callsign or wildcard search :
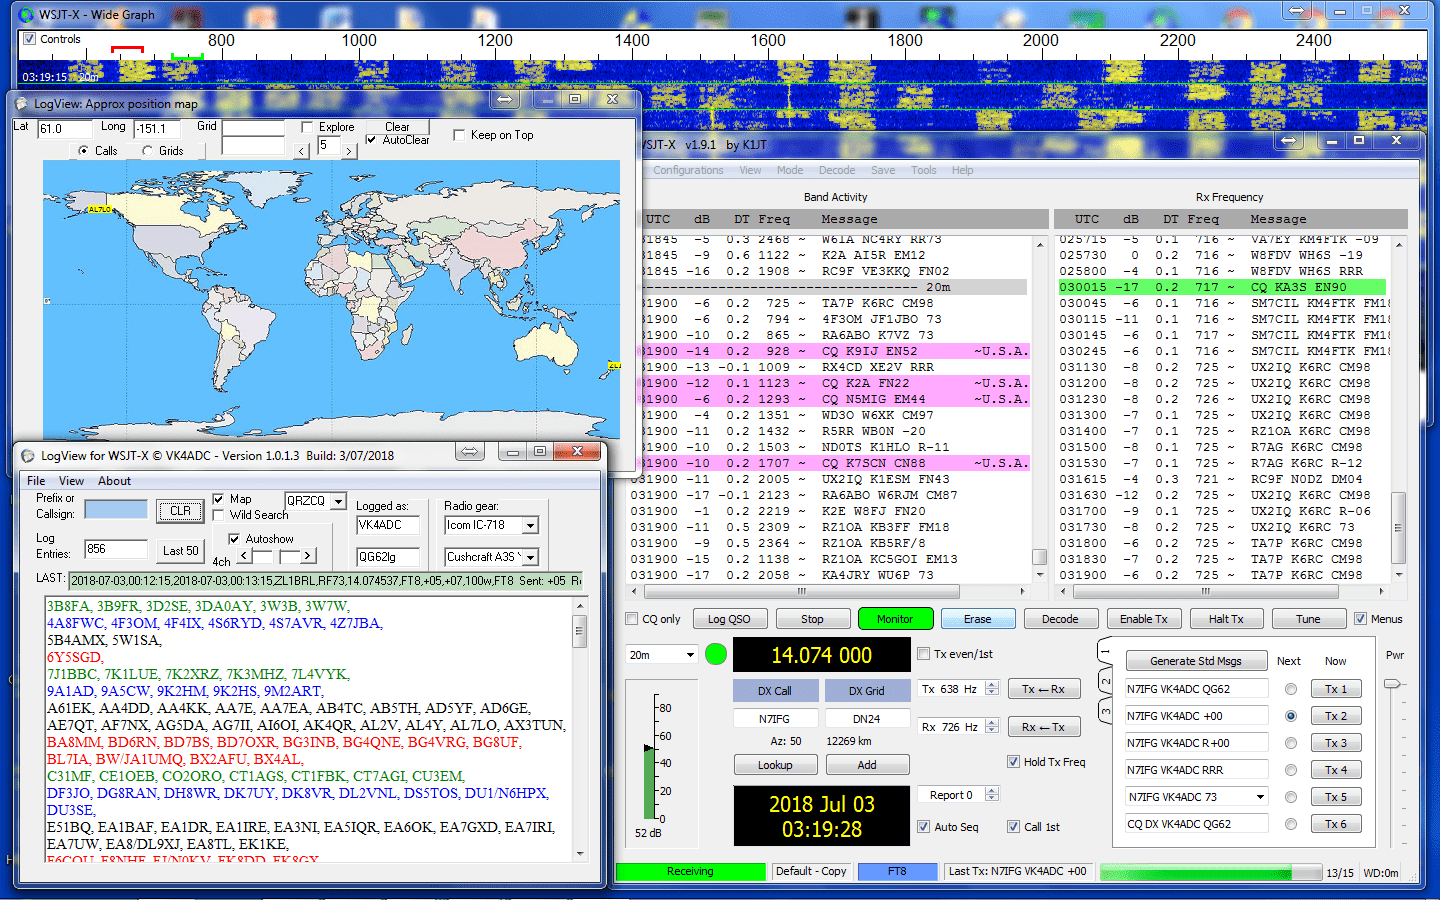
LogViewer for WSJT-X at bottom LHS of screen, V1.0.1.0 format, with AutoShow selected and displaying the last QSO.
As a newcomer to FT8 via the WSJT-X software, I was left with a question as to who I had worked already on the FT8 mode. You don’t really know until you import the contacts from the automatically generated (by WSJT-X) ADIF file into your main station log, and then you have to have the Logbook open. I use an older version of HRD software (the last one of the free version) and there are some tools to handle automatic import for the newer versions (HRD 6.x) but not 5.x so the process is slow – and manual. Apart from that, the is just way too much info on screen in a typical log book application.
Actually I added FT8 to the emission mode list in HRD so that it would support my contacts but my ADIF import failed because of the <QSO-Date-Off field contained in the data file output by WSJT-X. The ADIF export feature in the LogView software is compatible with HRD 5.x, eQSL and LOTW formats.
Back to the ‘who have I already worked’… Well, the WSJT-X software actually creates two log files in a specific folder, the ADIF mentioned above plus a comma separated text file and this latter file is the one that interests me at the moment. I opened it using Notepad and I could see my list of completed contacts easily enough but if I made another contact then I had to close it and re-open it. Not a very efficient process. Then the WSJT-X team implemented a UDP support function in V1.9.x originally destined for the N1MM+ logging software and it provides an immediate update of the logged data in ADIF format via TCPIP protocols and this is now the sole update source in this software. LogView reads the settings in the WSJT-X.INI file and alters its settings to suit, checking for any changes every 15 seconds.
A special note : You MUST have the 'Prompt Me To Log QSO' ticked (WSJT-X/ File/ Settings/ Reporting/ top box in the Logging panel) and actually log the contacts before this software will work.
I wrote this in Delphi7 (a visual Pascal) and it is small, quick and does not actually need any real installation process. Just copy the EXE file (supplied in the distribution ZIP) plus the included CTY.DAT file into a new folder (eg C:\Logview ) then make a shortcut from the exe file and ‘Send to desktop’. Other files will be created as the software runs but all are human-readable (via a good text editor) in .TXT or .CSV formats. Use is made of the Windows Registry to save values from one session to the next so an INI file is not used.
It is desirable – but not mandatory – that the LogView software is executed the first time without the WSJT-X software running. If it is, WSJT-X may display an error regarding file access – simply press OK until the error message no longer appears. This will depend also on how large the ALL.TXT file is as it is copied to be a local file and is processed into a file named ‘grids.txt’ – an abbreviated list of all callsigns and matching grid squares that your WSJT-X has ‘heard’ during the whole time that it has been operated. That file is then utilised to automatically fill in ‘missing’ grids in your own log – which happens all too often if you call CQ on FT8 and respond to callers.
If you do notice that there is no grid square detail in the 'Last' box (immediately after the callsign info, two commas) just after you have a QSO and it fails to appear on the map image (assuming that you have Map ticked), you can often counteract that by doing the following:
1. click anywhere on the Last box so the matching callsign list details appears
2. click File, 'Check grids in log' and you should see a progress bar appear briefly
3. click on the callsign line of the station you just worked
4. check that there is a grid square detail at the top of the QSO details screen
5. if there is, check the map plot for the presence of the callsign or grid detail (as selected)
-- alternate steps --
3. click anywhere on the Last box line again if there is now a grid detail after the callsign
4. check the map plot for the presence of the callsign or grid detail (as selected)
This only works if (1) your ALL.TXT contains a lot of history or (2) you have also been running the PSKRepView software - either over a reasonable period of time (ie weeks, not days or hours).
The basic application shows a list of callsigns sorted by prefixes, and each new initial number or letter starts a new line. A count of logged entries completes the display. If you have worked a new callsign in WSJT-X then it automatically appears in the application’s window, fully sorted. The 'Last 50' function provides easy access to recent contact details, allowing you to avoid re-works. Note : V1.0.22.x now has this as an autoview option on the View menu - click at the LHS of the menu item to activate the tick.
There is no QSO count limit in this software, the only effect noticeable might be a slowdown of some file accesses as the two log files and ALL.TXT grow in size.
It should run normally on any version of 32 or 64 bit Windows, preferably NOT on a USB stick due to typical access speeds..
==============================================================
Right-click to download : LogView.zip
Latest version : 1.0.22.3, Build date 17 February 2022
Distribution ZIP file size is about 3MB, expands to logview.exe at about 1.1MB plus cty.dat about 80KB, 4chPlaces.txt (30KB), lpng.dll (183KB) plus 3 map image files.
Two optional data files for V1.0.2.9 onwards : SomePlaces.zip (700KB) AllPlaces.zip (7.7MB)
These two files should be extracted into the same folder as the LogView executable.
The SomePlaces.txt file provides a reasonable level of location data for a Grid lookup function located just below the "Prefix or Callsign" box at top LHS and provides a scrollable list of places within that grid square. A 6-char search provides more exact location details if they exist in that 3MB data file.
The AllPlaces.txt file is 43MB uncompressed and contains over 1.2 million entries and used only for the "Places or Grid" search at top RHS when the "Extended" box is ticked. Otherwise it uses the smaller/faster SomePlaces data file. It is a "wild" search in that only part of the desired placename needs be entered, Character case is unimportant for the search. Enter a grid square, 4 or 6 character, or a place name - or part thereof - and press the Enter key to start the search function.
If changing from normal to extended search, tick the Extended box, then click into the "Places or Grid" text box and simply press Enter again. The search will take a while depending on computer performance so please be patient.
The file 4chPlaces.txt is activated only when the Details tickbox is set to ticked and, when available, nearby grid square details are listed against each entry in the search display screen.
To install, save the zip contents into a new folder before executing.
If updating to a newer version, simply overwrite only the LogView.exe file if you already have CTY.DAT plus the map image files in the folder.
IF you have an error box appear when operating on (for example) 60metres :

Image from F4GVO.....
Command line option "/nlu" in shortcut properties tells the software to do 'No Log Update' from the WSJTX.log file on startup, where it usually does this to catch up to QSOs logged when Viewer is not used simultaneously with WSJT-X all of the time.
This new version creates more backup and diagnostic files, always in text mode, thus viewable in Notepad etc.. They ensure that QSO data is not totally lost even if something else bad occurs.
V1.0.2.4 - 30 April 2020 : Fixed antenna band descriptors for bands with decimal points eg 0.4, 1.8, 3.5 as the software did not operate properly when on these bands. Operation on 160M always prompted for the correct antenna even when it shouldn't have !
V1.0.2.2/3 - 27 April 2020 : Added a new feature that compares the freq/band detail in the WSJT-X data against that of the currently-selected antenna, assuming that the rig and antenna details have been set up and the antennas.txt file contains properly constructed entries. eg Cushcraft A3S Yagi [14,21,28,] then H/B 12/17m Yagi [18,24,] then Wire dipole [1.8,3.5,7,10,] etc.. where the frequency coverage of each antenna option is specified within the square brackets (note - include the last comma before the ] bracket symbol.). The main callsign list now updates from various options other than just the CLR button. Now automatically makes backups of the local log file if more than 30 days has elapsed since the last backup : name format is 'backup dd-mm-yy hhmmss.txt'. New item 'Backup data' under the File menu allows for manual backup.
Now a beware message : you MUST include the frequency coverage of the antenna against any antennas listed in the file 'antennas.txt'; Failure to do so will result in a message asking if you want to select a different antenna. Consider yourself to have been advised !!!!
V1.0.2.1 - 15 April 2020 : Relatively minor changes, and added a Grid Look up box just under the callsign box at top LHS to make it easier to get Lat/Long plus bearing and distance from a gid square detail showing in the WSJT-X activities lists.
V1.0.1.10 - 2 Dec 19 : Minor reported bug fixes only.
V 1.0.1.9 - 9 Nov 19 : Solution applied for those who do not use a 'full stop' as a decimal separator, eg some of Europe. No other changes made except for displaying the age of ythe CTY.DAT at bottom LHS and warning if greater than 60 days old.
V 1.0.1.8 : The only change from v1.7 is that there is now a command line option to place in the properties of the shortcut. Adding /SKIPVERSIONCHECK bypasses the error detection that causes the "Old WSJT-X version notification - You are not using the latest version of the WSJT-X software. Go to the https://physics.princeton.edu/pulsar/K1JT/wsjtx.html to get the latest version to install. You need to install before this software will operate." message. With this option in place, it should work with any V2 release of WSJT-X.
V 1.0.1.7 : File menu now provides an easy way to update the CTY.DAT file if internet access is available. This is not an automatic feature like most of the other internal updates so should be run at least 4-6 times a year.
The WSJT-X ALL.TXT file is now automatically deleted if it grows to over 5MB AND has just been copied. Large filesizes (> 20MB) are taking a considerable time to read from the .disk and can cause WSJT-X errors to regularly appear (File Open error image as shown below). The desired data is processed regularly so nothing is lost by doing this and it is really just a throw-away file for WSJT-X too.
-------------------------------
12 September 2018: I have written an extra utility to allow users with ADIF files to convert them into LogView CSV format for use with this software package. It will convert only LogView-relevant fields - others will be ignored. There is minimal error-trapping and minimal functionality - use common sense to utilise it.
ADIFtoCSV.zip : Version 1.0.0.1
"Just installed your logview, works great. I was unlucky my pc went down the drain and my wstj-x.log was gone, This is a CVS file. I did an export from my log program and got the other file wsjtx_log.adi in place with all my FT8 qsos, I can see in your logviewer that you have an "export to adif" is it possible to make a import from adif file to CSV ? , I`m not so much into software programing, I have my complete FT8 log in adif format, I would be great to get it in CSV format too, so I could use it in Logviewer. Thank you in advance"
Today, after the utility was used :
"Works perfect, Now Both my programs have log again :-)
both logviewer and wstj-x.
Thank you so much !!! and you should make the utility available on the web site
Very usefull if things go wrong !! Again many thanks Doug"
==============================================================
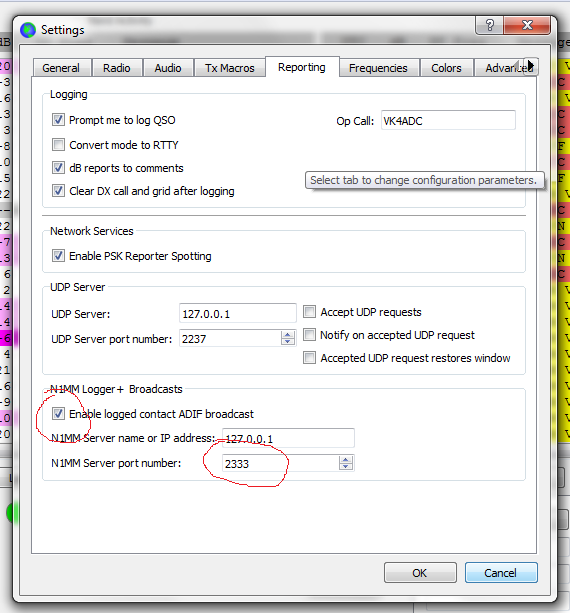
You need to make sure the above settings in WSJT-X configuration (as marked in red) in V1.9.x are marked as shown.
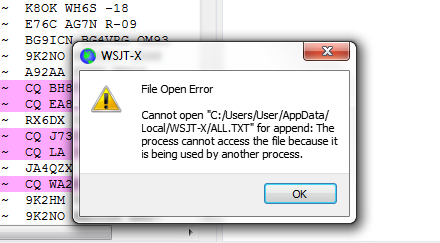
If perchance the above error box appears for WSJT-X, press the OK button and it should disappear.
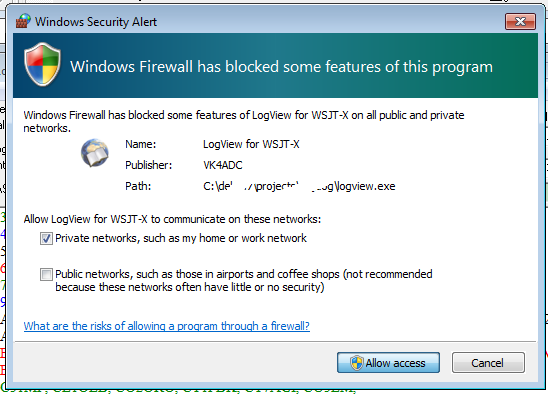
The first time the LogView software is executed, it will almost always result in the above box. Press the Allow access button to continue.

The settings from WSJT-X as above are utilised by LogView and the port number is discovered and updated automatically, even when the port number is altered in real time.

The logging support feature includes options to retain which radio and antenna was in use. Use the File menu items to create and/or edit the files to provide these details, one description per line.

The typical radios list box contents for my station
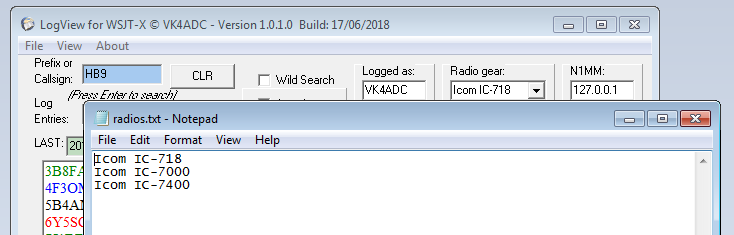 The contents of the radios.txt file that resulted in the previous images.
The same arrangement exists for the antennas.txt configuration file, again created or edited from the File menu